Adding a Starter Relay
Disclaimer: I only do this stuff for fun, you assume all risk to self and property.nbsp; I'm only documenting what worked for my situation, your mileage may vary! That said, let's get on with it...
A few years ago I started having the common "clicky” starter issue on my '86 Alfa Spider which usually signals that the ignition switch is on its way out, which I fixed by adding a starter relay. This seems to be a relatively common problem with Alfa Spiders. I recently started having a hot start issue with my Verde where I would turn the key to the start position and nothing would happen for 2-3 tries so given my experience with the Spider I immediately suspected the ignition switch was starting to go. I did some poking around on the Web and found very little about this issue on Milanos for some reason, not sure why it wouldn't be just as common on them as Spiders, perhaps because the total number of cars is smaller? I did find a couple of references to this issue on the alfabb but they had no pictures and a very short explanation of what exactly needed to be done so I figured I'd do it and take a few pics to make it easier for the next guy.
I did spend a fair amount of time when I did this on my Spider trying to
figure out what wires I should tap into and ended up with a solution
that worked but wasn't the most elegant install. Turns out on the
Milano it is MUCH simpler to install a starter relay.
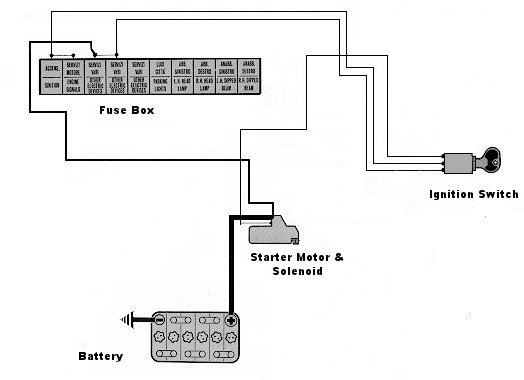
First a little about why this happens...
The problem is that many older cars do not have starter relays and instead
run the full amperage (current) needed to run the solenoid through the
ignition switch which are really not engineered to withstand a lot of
amperage and over time deteriorate. Here is a
picture showing the typical non-relay wiring for a starter (this isn't the
Milano wiring diagram but they are all pretty similar):
As you can see, the full amperage of the battery goes through the little
ignition switch. Here is what the diagram looks like when the starter relay is added.
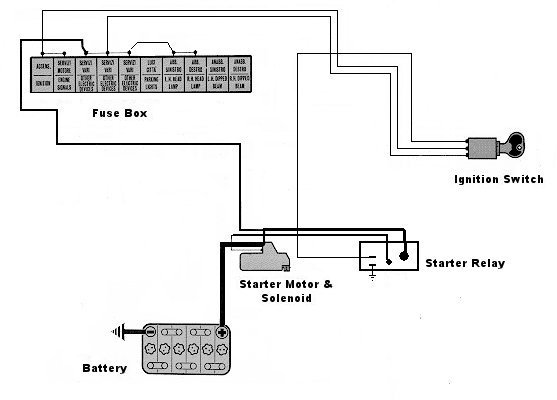
What this does is make it so that only a low current load will be sent
through the ignition witch when it is in the start mode. The low
current is used to activate the relay which then allows the high
current load to pass through the other two posts of the
relay.
The relays are built to withstand the high load, unlike the ignition
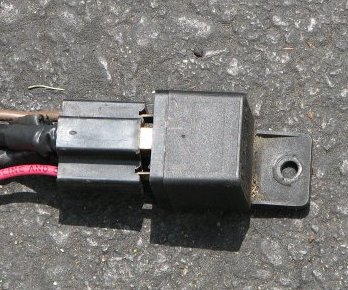
switch! I dug around in my spare parts stash and found a spare
Bosch relay (any 12v 30A relay should work, mine actually says 20/30A
on it) and pigtail.
DISCONNECT THE BATTERY, don't want anyone getting a nasty zap!
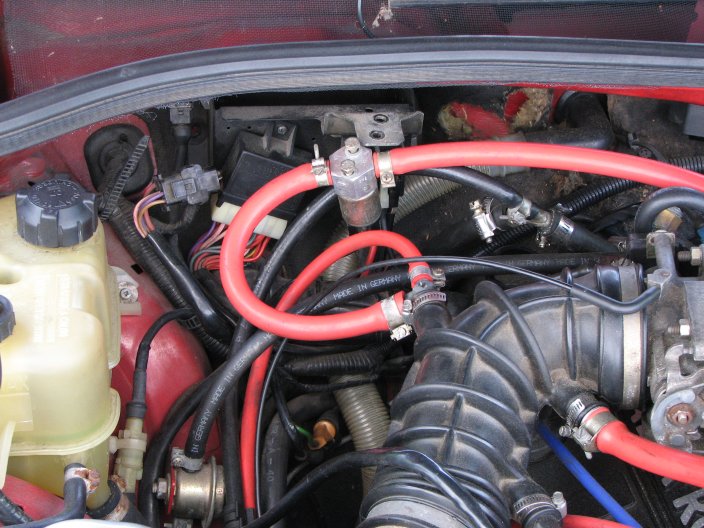
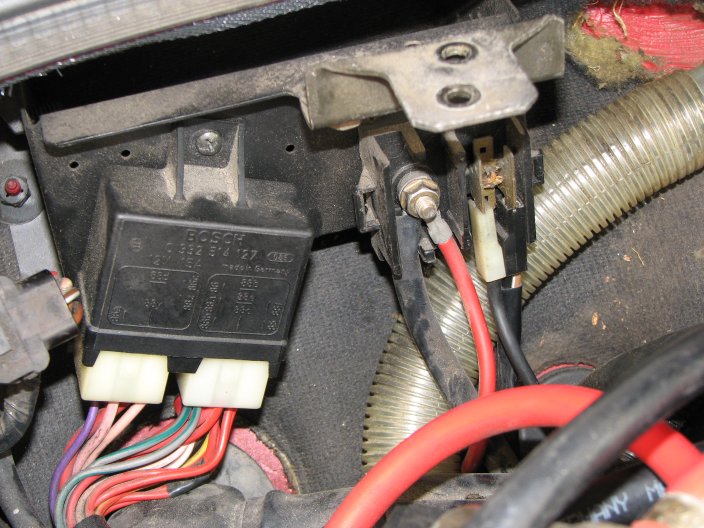
Figure 4 shows where all the work for this project takes place, right next to
the combi-relay. First unbolt the A/C solenoid (silver cannister with
two bolts on top and red hoses coming out each side).
Once that is out of the way you can take the cover off of the
junction box, be careful, the plastic tabs may be brittle. The black
wire with the white connector is the wire that attaches to the small post on
the starter solenoid. The double wire in with the black connector
(hard to see in the pic, one wire is brown/white and the other is
black) is the wire pair connected to the ignition switch. I used
a tiny screwdriver and took the plastic connectors off of these two
wires so they just had the metal spade connector exposed.
The other two wires you will need to make. The first is a short wire
just long enough to reach from the relay connector to the power post
with the nut on it in the picture above. In Figure 7 you can see
the wire I added (reddish pink). The second wire you need to
create is the ground wire. For this one I used a piece long
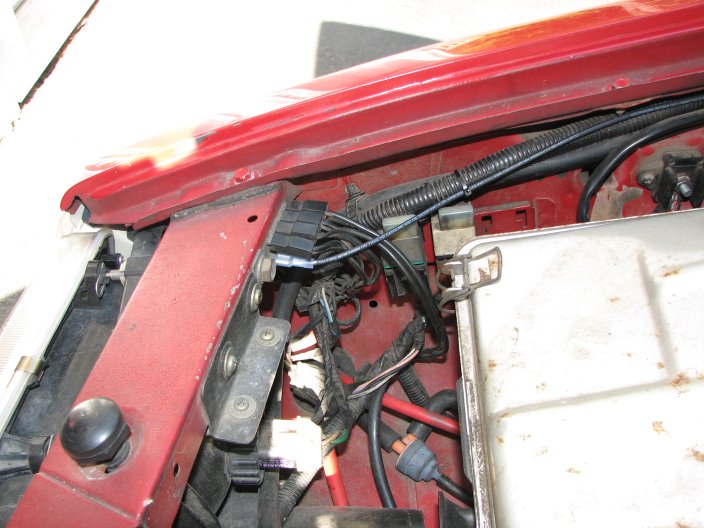
enough to reach from the connector to one of the extra ground spades
near the headlight (see Figure 8).
You can either attach the wires directly to the relay with spade connectors
and then put electrical tape around them to ensure they don't touch or
do as I did and reuse the connector that I had in my stash. I
just pulled all the old wires out and shoved the spade connectors
in. Since they don't have the nice little tabs to keep them from
backing out you need to hold the wires at the back of the connector
tightly while shoving it onto the relay.
Now simply attach the wires to the appropriate terminal on the relay:
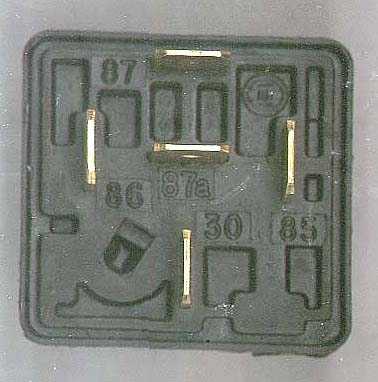
The new short wire (red/pink one in Figure 7) that attaches to the post
with the nut goes to terminal 30 on the relay, this is your contant on,
high current power from the battery.
The black wire with the white connector that you pulled off the
junction box goes to terminal 87 on the relay, this is the wire that
goes to the small post on the starter solenoid.
The double wire (brown/white & black) that you pulled off the
junction box goes to terminal 86, this is the wire that goes to the
ignition switch.
The long ground wire you created is attached to terminal 85 on the relay.
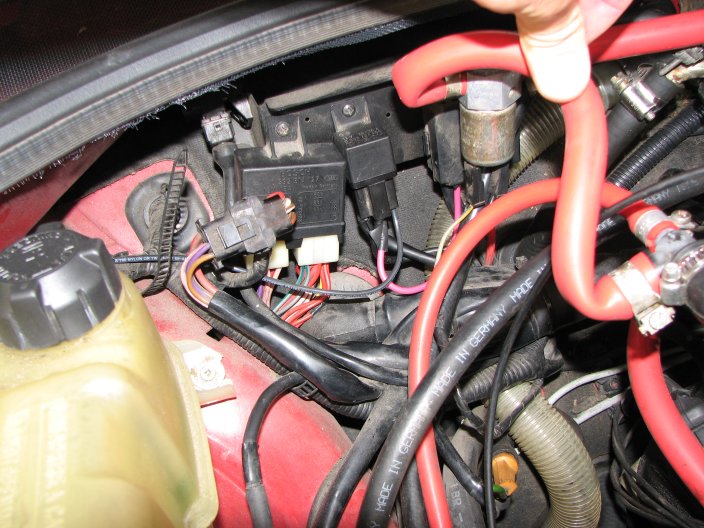
Next thing I did was to move the combi-relay to the left a bit to make some
room for the new starter relay. I screwed in the new relay, zip
tied the long ground wire and reattached the AC solenoid. Then reconnect the battery.
Now you are done, go start the car. Mine was having this problem with
hot starts and I've now driven with it for many years with no more starter problems!